I've been putting off the final steps in harvesting our quinoa. We still needed to winnow our quinoa, which is where the chaff is removed from the seeds. This is the second year we've grown and harvested quinoa, and so I knew from past experience that it takes a bit of time and patience to winnow quinoa. And so, rather than dealing with it at the time of harvest, I put the dried quinoa into a big paper bag and saved it for later.
Before getting into how to winnow the quinoa, I'd like to show you how beautiful quinoa plants are in the summer and autumn.
Additionally, quinoa is drought tolerant, producing seeds and filling in a space with its lush colors despite receiving little water over the summer. They are an easy and enjoyable plant to grow.
Once it was time to harvest the quinoa in the fall, we cut the plumes off the plants and stacked them on a drying rack, leaving them there until they were completely dry (which took about 3 weeks).
This one rack usually has multiple projects on it, with seed drying and plant starting often happening simultaneously. To keep the seeds clean, I use paper towels on the bottom and sometimes I cover the seeds with another paper towel.
Then I rolled the top of the bag closed and put it in a cool, dark corner of our parlor. It sat there until now. I've been feeling guilty for not doing anything with it since then. I was slightly worried that bugs might have found a way into the bag, or that the seeds had degraded. Thankfully, neither of those happened. The bag remained bug-free and the seeds look okay.
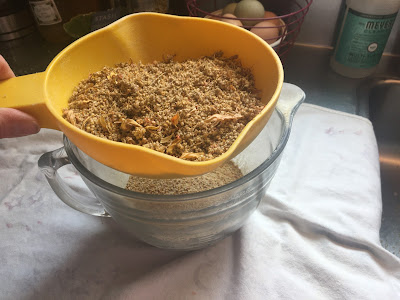
It was a rainy, dreary day today, and I had caught up on a lot of other projects. I decided it was time to deal with the quinoa. There are many ways to remove the chaff from the quinoa seeds. Since I was doing this task indoors due to the rain, I decided to tackle the project in the kitchen using two types of colanders. The first colander that I used is yellow and it has wider holes that helped to separate the seeds from the bigger stems and leaves.
I just used my hands to swirl the seeds around and around in the colander, so that the seeds fell through the holes in the bottom of the colander, going into the bowl. Then the remaining stems and chaff that were left in the colander were put into a bag for adding to the compost pile later on.
Next I used a fine mesh strainer to remove the smaller particles of the chaff from the seeds. Again, I swished the seeds around and around in the strainer. This time, it was what was left in the strainer that was kept. The strainer now contained the seeds and the bowl had the fine particles of chaff that I will later toss into the compost pile.
Working in small batches, these steps were repeated multiple times until I had gotten through all the quinoa in the paper bag. Below is how the quinoa seeds looked, once nearly all of the chaff had been removed:
Two small steps remain before this quinoa can be cooked and eaten. First, I will need to use a fan or hair dryer to blow away any small pieces of chaff that remains. There isn't much chaff left, but I can see little bits in there. I'll wait until we have a dry day to do that step outside. Finally, I'll need to rinse the seeds really well to remove the saponin, a bitter and toxic compound that exists on the outside of the quinoa seed, which protects it from being eaten by birds. I always save that step for when I'm going to cook it, since I don't want to have to dry the seeds again before storing.
To make sure I don't forget to do those last two steps later, I wrote them on the gallon-sized plastic bag that I stored the quinoa seed in.
From the small plot of quinoa that we grew, we ended up with about three cups of quinoa seed. Quinoa is an expensive seed to buy at the grocery store, and so this is one grain that I think is worth the effort to grow, especially since it is drought tolerant and is so attractive in the garden. Deer also tend not to eat it. You could always grow a lot more of the quinoa plants if you want a bigger harvest. Just keep in mind how much time you want to spend later on, doing the harvest steps. We always like to start small the first year so we can get a feel for what's involved.


Comments
Post a Comment
Thank you so much for submitting a comment! All comments are reviewed by our moderator before being posted to the blog, in an effort to help control spam.